The Montana Mei Tai© is Finished!

FINISHED PROJECT: THE MONTANA MEI TAI©
Scandi Style Mei Tai Baby Carrier

I started this project back in January and actually finished the majority of it back in April. Well, today I put this finishing touches on The Montana Mei Tai© and it is officially a FINISHED PROJECT! All it needed was the tabs to attach the hood straps to the shoulder straps and the snaps on the hood straps. It turned out to be a bit more challenging than I had hoped - a universal needle was not up to the job of satin stitching through 800 layers of strap, batting, and what not. But I powered through and it's done, done, done!! 

The Montana Mei Tai©
Purple Batik Wacky Fabric©; Black Twill; Dark Purple Minky

The waist and shoulder straps are 5" wide and padded strategically for a comfortable fit.
The shoulder straps are extra long to allow for my extra padding and to allow a larger number of ties. Some ties require longer straps. 


You can wear the waist belt down like it is shown here for toddlers, or fold it up for infants and smaller babies. 

My 20 pound 14 month old in a Ruck style back carry with a Tibetan Tie


The body is wide, so it gives good support. 

A comfortable and ergonomic seat. Note how her knees are slightly higher than her bum. This is good babywearing posture!

A closer look at the Tibetan Tie.

Babywearing Rocks!

My 30 pound 3 year old. Sullen but comfy!

Diaper Making: The Maiden Voyage

MAKE YOUR OWN CLOTH DIAPERS
For Next To Nothing!

You may be wondering why I would ever need to make my own cloth diapers. I have a more than ample stash of wonderful pocket diapers and all-in-one diapers for both of my girls. Well, it appears that Rowan has developed a sensitivity to the PUL which covers the outer on most of our diapers. In an effort to save her poor little chunky monkey legs, I decided to try to make a cotton fitted diaper with a fleece soaker (aka diaper cover). I was really pleased with the results and plan to make more in the near future.

I found a wonderful website called Frugal Diaper Making and used their instructions for creating a Pocket Fitted cloth diaper. I used 2 old T-shirts, some scrap velcro, and a bit of elastic - total out of pocket cost: ~ $1. The hardest part was transcribing their pattern onto some quilting grid. The actual cutting of fabric and sewing of diaper took me less than an hour. The body of the diaper consists of 4 layers of cotton and the inserts each have 4 layers as well, so with both inserts in there are 12 layers of absorbent cotton to get the job done.

The Frugal Pocket Fitted - Size Medium

The Fitted Diaper and 2 Matching Inserts for Customizable Absorbency

The Pocket is in the front of the diaper. Here you see it stuffed with both inserts.

Laundry Tabs to attach the velcro to so it doesn't stick to everything else in the wash cycle.

The Frugal Pocket Fitted in action. 

I also made her a Soaker out of remnant fleece from Katrina's Free Soaker Pattern. She has free patterns for Wool and Fleece Soakers and Longies on her blog. Easy to print out and comes in many sizes. Total cost: ~$1. It took me about 45 minutes to cut out and sew up this Fleece Soaker with an extra layer in the wet zone. Do you love that the contrasting pink thread matches the thread from the diaper? The fleece is both water resistant and breathable, so it will keep the wetness inside while allowing her bum to get good air circulation.

The Fleece Soaker - Size Medium

The Fleece Soaker in action.

These items were very easy to sew, and quite economical as well. You could spend a bit of money and purchase new materials to make them with, or save a TON of money by using old t-shirts, sweatshirts, sweaters, blankets, sheets, or whatever appropriate material you can find in the bottom of your closet or even on the freecycle list or at the thrift store. Flannel and bamboo would also make for wonderful fitted diapers. And you could always include a wicking layer of microfleece or suedecloth on the inner to help keep sensitive skin dryer. 

Happy Frugal Diapering!

I Almost Finished

My sewing project is almost finished. A few minor details and the Montana Mei Tai will be done! Photo finish and editorial, I promise!

Crafty Update

I seem to have been insanely busy getting a whole lot of nothing done over the past few weeks! I am completely stalled out on all of my projects as a result. The Little Leg Warmers are waiting to be sewn. The Montana Mei Tai has padding in the straps, but still needs to be constructed. I hit 3 full size and 1 mini Tawashis and ran out of steam.  Kid crafts have been on the back burner due to an insane Yo Gabba Gabba addiction and toddler defiance - and yes, mommy exhaustion.

Today we did start on a new collaborative craft. Ophelia helped by painting the stems and the material for the leaves. Tomorrow we are planning on painting the flowers, which I cut out and folded today. I will then construct the Toilet Paper Roll Daisies and post a picture of the finished product. And maybe even a tutorial, if I can get both hands free to blog a bit.

And to add to my never-ending list of projects, my mom just sent me a whole box of paper crafting supplies. Custom Cards, here we come!

Happy Crafting

Lot's of Lexi's Little Leg warmers

LITTLE LEG WARMERS

If you've never seen baby leg warmers, you are in for a treat! We are great leg warmer enthusiasts in this house: both of our girls are wearing leg warmers on most days - even in the summer time. They are a great layering item in the winter - keeping little legs warm when those pant legs ride up, a cute and practical alternative to tights, they help keep baby socks ON, they protect delicate knees from hard floors and rug burns when crawling and learning to walk, they make diaper changes and potty training a breeze, and they are a great way to keep sun off of that precious baby skin in the summer time. And did I mention cute? SO darn cute!! 

Ophelia, 11 months, Bumblebee Babylegs

The original baby leg warmers are BabyLegs. And they are a fantastic, well made product. You can get them at any number of online stores and in an incredible array of cute colors and prints. We have a small fortune in BabyLegs in our baby drawers around here. That's because they run from $12 to $15 a pair. Yikes! 

So what is a tiny fashion plate to do, not to mention TWO tiny fashion plates? My friend Lexi figured it out. She turned some inexpensive, yet very cute, knee socks into Little Leg Warmers. She even wrote a tutorial on her blog: Little Leg Warmers in Six Easy Steps

I got the tip off yesterday that Target was having a sale. And boy did I take advantage. I bought 17 pairs of knee socks for less than the cost of 4 pairs of Babylegs. 

The whole stack of wonderful socks!

Blue for Twin Boys a friend of mine was just blessed with.

Girls can wear blue too. 3 pairs for $5!

The purple set!

St. Paddy's Day Legs! These were a splurge at $5/pair.

Warm colors. And only $2 a pair.

Super soft argyle style. Middle of the road at $3.50 a pair.

My plan is to cut and pin them tonight and sew them over the next day or so. Stay tuned for a photo of the completed leg warmers.


Tawashi

ACRYLIC TAWASHI
It's a Scrubbie!

I will start off with an obligatory Tawashi joke: What is a Tawashi? It's a scrubbie tawashi things with! HA HA HA HA! 

Seriously, now. It really is just a basic scrubbie. The traditional Japanese Tawashis were made from hemp palm and resembled more of a brush than a scrubbie. A Tawashi can be anything from a loofah to a sponge to a ball of steel wool: if it fits in the palm of your hand and you can scrub (and therefor clean) things with it, it's a Tawashi. 

I first saw these nifty little things on my friend Lexi's blog: Full of Knit. Here you can see a great list of reasons why Tawashis are Sugoi (that's 'great' in Japanese).  She also promised to post a tutorial on how she made them, but she never did....so I was inspired to go out and find a free, fun, and easy pattern for one. And since Ophelia was looking over my shoulder while I was searching, I decided that my first one would be a Bath Tawashi for her. And here it is:


The pattern for this Tawashi is from How to Crochet a Tawashi on CraftStylish. I made this exactly as the pattern is written with the exception of using a single color yarn instead of three different colors. This was very easy to crochet, and while I can't say that I can make them at 'factory speeds', my goal of one a day for the next week is not outlandish. I used a Caron Dazzleaire acrylic/nylon blend in MULBERRY 2676 to make this one. It's soft enough to use on delicate skin and the pattern creates a nice texture that is great for exfoliating. And it is machine washable and dryable - so we can reuse these, unlike those plastic bath poofs or the dreaded kitchen sponges that need to be tossed out when they get funky.

You can make them out of any yarn you have on hand. This is a great stash buster project, as it uses very little yarn.

Here are a couple of lists of patterns for crocheted and knit scrubbies, dishcloths, and Tawashis:

Stack and Hack© Tutorial

STACK AND HACK© TUTORIAL
How to make your own Wacky Fabric©
~~FOR PERSONAL USE ONLY~~

This method of making Wacky Fabric© was shown to me by my mother. The first time I saw it, was on a quilt that she made for my daughter Ophelia. 

MATERIALS:
  • At least 3 different color/patterned pieces of fabric that are the same size. Fat quarters are ideal for this, but you can use any size that you would like, as long as all of the fabric pieces are the same size.
  • Rotary cutter, mat, and ruler
  • Quality thread
  • Sewing machine and basic sewing notions: bobbins, scissors, pins
  • Iron and ironing board.


For this tutorial, I used 5 fat quarters in varying shades of purple batik. 

Step 1: Wash, dry, and press your fabric pieces.

Step 2: Stack your fabric with right sides facing up and as evenly as possible. I like to line up the selvedge edges and then trim any uneven or raw edges so the fabric is all the same size and squared up. 

Fat quarters ready to be squared up. (No, you are not colorblind. I forgot to photograph the purple before making the first cut, so these green ones are standing in.)

Step 3: Cut your fabric at an angle. Any angle but 90º. There is really no wrong way to do it. For this tutorial, I made my first cut lengthwise and approximately in the middle.  

Step 4: Take the top piece of fabric from the right hand stack and move it to the bottom of the stack. 

Step 5: Taking the top piece from each stack, sew each fat quarter back together: Place right sides together, pin in place (or not, if you are wild like me), sew a straight seam with 1/4" to 3/8" seam allowance. I used a 3/8" seam allowance for this tutorial. Keep your pieces in order and oriented the same as when you started. I used the selvedge edge as my 'top' to help me with this. 

Fat quarter after first 'hack' and sewn back together.

Step 6: Press seams open.


Seam pressed open on wrong side of fabric.

Step 7: Re-stack your fabric so the edges are even and aligned. Again, make sure you keep the layers in the same order and oriented so the same side is always on the right.

Repeat steps 3-7 until you get your desired result.

Second cut made to the right of the first and at a different angle. Getting ready to make a third cut at yet another angle.

A fourth hack to the right of the second one and a fifth hack to the left of the third gives me six long sections.

Hacking in the opposite direction.

A second hack with the right side pile re-stacked.

A third hack with the right side pile re-stacked.

A fourth hack with the right side pile re-stacked.

Five "Wacky Fabric©" Fat Quarters: each is unique.

The new pieces are considerably smaller than the original Fat Quarters.

You can now use your Wacky Fabric© any way you like. Sew four of the quarters together to make a larger piece that is the perfect size for a baby or lap quilt top. I used mine as a decorative fabric on the outside of my first Montana Mei Tai©

Remember, there is no wrong way to Stack and Hack. I made more hacks because I wanted a smaller scale to my pattern. You can make fewer hacks to achieve a larger scale.


Here are a few examples:

Quilt for Ophelia, made by my mom.

Quilt for Ophelia, made by Miss Viv

Quilt for Rowan, made by Miss Viv


~~FOR PERSONAL USE ONLY~~

Happy Crafting!

A Wristlet for My Sister

Wristlet with Lap Closure

Flashback to December 2009. I was frantically sewing projects for Christmas presents: hats for my dad and brother in-law; soap socks, bag cozies, and scented sachets for our family gift swap, outfits for my girls. But what to make for my sister? She can be a tough one! I had gone to a very fun Cardmaking Class in November and I had decided that I was going to gift the cards I made to her, but that just didn't seem like it was enough. Then I stumbled upon this great Wristlet Tutorial at Javajem Knits. Perfect. And I had just enough fabric left over from a bag I had made for her! YAY! I didn't have a zipper on hand, so I modified the pattern slightly to make a lap closure on the wristlet. And I made it just the right size to fit those hand made cards into. So now she has a nice little 'card wallet' that she can keep in her matching shoulder bag. And when all of those cards are used up, she can use it to keep other junk in! Cute, and surprisingly easy. I used scrap fabric, lightweight fusible web scraps, and coordinating thread. Be sure to check out the links above to see the cool cards I made and also to see the entire tutorial on how to make one yourself!


Happy Crafting!

New Project: Montana Mei Tai©

THE MONTANA MEI TAI©
Scandi Style Mei Tai Baby Carrier

After scouring the interwebs for a free pattern and not finding exactly what I am looking for anywhere, I have created a body and hood pattern of my liking by cobbling together bits and pieces and details from several different sources as well as a few bits of my own design. The shape of the body and hood is mostly inspired by the Taitasi Meitai - a traditional Scandinavian carrier made in Norway that is not only beautiful, but VERY pricey.  The method of construction has elements from a widely used and widely loved Scandi Mei Tai Tutorial and another great DIY from Game of Life. I'm quite happy with how all these elements have come together to create what I am calling The Montana Mei Tai©.


I finished designing and drawing my pattern this afternoon and am anxiously awaiting the materials from Fabric.com. I have 3 yards of black heavy weight brushed twill and a yard of purple Minky fleece on it's way! The twill will be for the shoulder and waist straps as well as for the main support in the body construction. The Minky is for a soft, plush lining. I have some really gorgeous purple batik prints that I am going to blend to create the outside of the carrier and a boatload of fleece that I will use as batting to pad the shoulder and waist straps as well as the body of the carrier.  This particular carrier is intended to be a 'cool weather' carrier - seeing as how it will be insulated. When this one is completed, I have plans for a non-insulated 'warm weather' version as well.


I am very excited about this project! Stay tuned for updates. I hope to complete this within 2 weeks, depending on when my material arrives and how much 'hands free' time my girls allow me!


Feb 4th update: The fabric has arrived!! Now to wash it and cut all of the pieces...


Feb 10th update: I have washed and pressed all of my fabric. I am in the process of making some"Wacky Fabric©" out of my batiks: this will be the decorative fabric used for the outside of the Mei Tai. Stay tuned for more updates and a "Stack and Hack©" tutorial for making the Wacky Fabric©. Edit: I have changed Stack and Whack to "Stack and Hack©" (for now), as "Stack-n-Whack" is a trademarked method of making a magic kaleidoscope quilting square. You can read more about it here: Stack-n-Whack. My method is a bit different. 


Feb 14th update: All of my fabric is cut and pressed. The hood is 95% completed. I only need to close the hole where I turned the fabric and add quilting ties to the decorative side. And, of course, attach it to the body. Here is a sneak peak:


Hood before top-stitching.


Applique.


Body: decorative panel - made from Wacky Fabric©

The Butterfly Hat

Today's project was a quick hat for Ophelia. I found this pattern at Vallieskids and it's called Olivia's Butterfly.


More scrap yarn and my J hook made this an easy afternoon project. The yarn is a mauve colored worsted weight acrylic that has a bit of sparkle woven into it. I knit this to pattern with the exception of the 'body' of the butterfly. The pattern called for one stitch to create the body, but I used 5 to give it a fatter body.  I can't wait to see the look on Ophelia's face when she finds this at her place at the table in the morning. I will post another picture of her wearing it tomorrow!

Update: She loves it! She's been wearing it since she got it this morning!


Happy Birthday Dad!

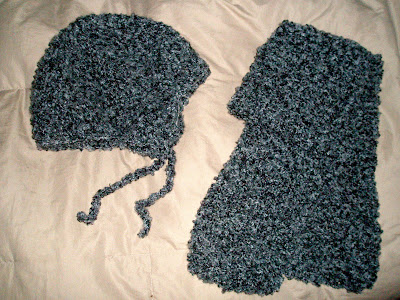
I know how much my dad loves his hats. I made him a '4-pack' of fleece hats for Christmas. For his birthday last week, I made him a scarf and hat to match. I thought he might like something slightly dressier for wearing to work.


Once again, I dipped into my scrap bin for yarn. This is a charcoal grey and black blended yarn. It is quite soft and has a lovely knobby texture. The scarf was knit in garter stitch with size 13 needles. It is approximately 6 inches wide and 4 feet long. The hat is another go at The Flap Dash hat from Simple Knits. I added two increase rows then continued in half double crochet instead of double crochet to finish the body of the hat. I made the ear flaps 20 stitches apart along the back of the hat and I added an additional 5 chain to the ties. Hope he likes them!

UPDATE: I think he likes them!!


The Flap Dash Hat

I found this pattern at Simple Knits. It's a super simple ear flap hat that you can whip up "in a dash." The ear flaps are simple shells that are crocheted right in pattern without breaking the yarn.


I made both hats from a ball of  purple and green variegated worsted weight acrylic that I had in the scrap bin. I made the first one (on the right) exactly as the pattern was written. I intended it to be for Ophelia, but it ended up being perfect for Rowan (6 months). I love how the yarn came together to give it a sort of swirl pattern. The second one, I added one additional increase row and it was perfect for Ophelia (2.5 years).

Powered By Blogger

Design by Blogger Templates