New Project: Montana Mei Tai©
I finished designing and drawing my pattern this afternoon and am anxiously awaiting the materials from Fabric.com. I have 3 yards of black heavy weight brushed twill and a yard of purple Minky fleece on it's way! The twill will be for the shoulder and waist straps as well as for the main support in the body construction. The Minky is for a soft, plush lining. I have some really gorgeous purple batik prints that I am going to blend to create the outside of the carrier and a boatload of fleece that I will use as batting to pad the shoulder and waist straps as well as the body of the carrier. This particular carrier is intended to be a 'cool weather' carrier - seeing as how it will be insulated. When this one is completed, I have plans for a non-insulated 'warm weather' version as well.
I am very excited about this project! Stay tuned for updates. I hope to complete this within 2 weeks, depending on when my material arrives and how much 'hands free' time my girls allow me!
Feb 4th update: The fabric has arrived!! Now to wash it and cut all of the pieces...
Feb 10th update: I have washed and pressed all of my fabric. I am in the process of making some"Wacky Fabric©" out of my batiks: this will be the decorative fabric used for the outside of the Mei Tai. Stay tuned for more updates and a "Stack and Hack©" tutorial for making the Wacky Fabric©. Edit: I have changed Stack and Whack to "Stack and Hack©" (for now), as "Stack-n-Whack" is a trademarked method of making a magic kaleidoscope quilting square. You can read more about it here: Stack-n-Whack. My method is a bit different.
Feb 14th update: All of my fabric is cut and pressed. The hood is 95% completed. I only need to close the hole where I turned the fabric and add quilting ties to the decorative side. And, of course, attach it to the body. Here is a sneak peak:
Posted at
4:30 PM
|
![]() |
0 Comments
|
0 Comments
The Butterfly Hat
Today's project was a quick hat for Ophelia. I found this pattern at Vallieskids and it's called Olivia's Butterfly.
Update: She loves it! She's been wearing it since she got it this morning!
Posted at
10:19 PM
|
![]() |
1 Comments
|
1 Comments
Happy Birthday Dad!
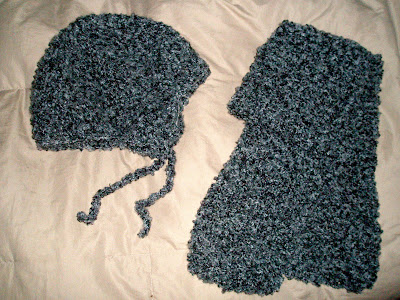
I know how much my dad loves his hats. I made him a '4-pack' of fleece hats for Christmas. For his birthday last week, I made him a scarf and hat to match. I thought he might like something slightly dressier for wearing to work.
UPDATE: I think he likes them!!
Posted at
9:54 PM
|
![]() |
0 Comments
|
0 Comments
The Flap Dash Hat
I found this pattern at Simple Knits. It's a super simple ear flap hat that you can whip up "in a dash." The ear flaps are simple shells that are crocheted right in pattern without breaking the yarn.
Posted at
9:36 PM
|
![]() |
0 Comments
|
0 Comments
Homemade Play Dough
The Recipe
I decided that it would be more fun, and perhaps more manageable to cook, if we split this recipe into four parts and made four different colors. We chose purple, green, blue, and orange. I set out four bowls and did the math real quick. I measured and Ophelia dumped each ingredient into its own bowl. Then we mixed up four half cups of colored water and Ophelia got to pour those into the bowls too. IMPORTANT: You definitely need to color the water before you add it to the rest of the ingredients or you will not get even coloration of your dough! I let Ophelia stir each bowl up as best she could then I whisked each batch smooth. I sure wish I had been able to get pictures of this part, as we had a great time and made a great mess! But since Rowan was helping too, I didn't have a free hand for the camera.
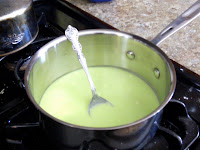
 The mixes are made, now on to the cooking! I used a small sauce pan over medium heat, stirring constantly. In about 3-5 minutes, our goopy mix magically came together into a solid doughy pile. I removed it from the heat, scraped it onto my floured countertop with a silicone spatula, and kneaded it (gingerly now - it's still HOT!) for about 30 seconds or so until it was smooth and the consistency of, well, Play Dough! I washed out the pot, rinsed, and repeated for the other three colors. Presto Play Dough!
 We played with it today and it is great! Works like the store bought version but better. It is quite soft and easy for little toddler hands to mold, but not so sticky that it sticks to everything. Easy to clean up too.
 Posted at
1:24 PM
|
![]() Labels:
homemade,
kids,
play dough
|
1 Comments
Labels:
homemade,
kids,
play dough
|
1 Comments
Fleece Hat and Pants: Buzzy Bees and Sunflowers
Finished Rowan's Pants and Hat set today! Here are a few quick shots. I'll take better photos of the finished product when I finish Ophelia's set!
Posted at
3:09 PM
|
![]() |
0 Comments
|
0 Comments
A Blog for Sharing our Craft Projects and Ideas
From knitting and crochet to sewing and scrapbooking. If we craft it, you will see it here.
My most recent project is sewing fleece yoga pants with matching hats for the girls. One set is completed and I have 3 more to go! All I need is a bit of free time - and that is hard to come by with two sick babies.
Other projects in the "To Do" list are: cloth wipes, cloth diapers, pee pads, fleece pants and vest for myself, a lap quilt, a knit hat for Rowan, and knit wrist bands for Ophelia. I am also designing a bag - sort of purse meets tote - that I hope to sew a prototype of sometime this month.
Some past projects include many many fleece hats, crocheted hats, crocheted dish rags, cloth baby wipes, cloth fitted diapers, a shoulder bag for my sister, a tote bag (which was my first sewing project and can be seen in the slideshow), shoulder bags for moms and toddlers alike, pumpkin carving (hey! that's crafty!), my ceramic pot from Arts on Fire, and handmade cards (check out My Neck of the Woods - it's in my crafty blog list).
You may also see some toddler art show up on this page! We have started doing daily crafts with Ophelia and we have had a few that are actually quite good!
Happy Crafting
Posted at
11:32 AM
|
![]() Labels:
Cardmaking,
Crochet,
Introduction,
Knit,
Sew,
To Do List
|
0 Comments
Labels:
Cardmaking,
Crochet,
Introduction,
Knit,
Sew,
To Do List
|
0 Comments
